Sidebar
This is an old revision of the document!
Table of Contents
Installation guide
This page gives all the instructions for the installation of Visual Studio, Fortran compiler, and GitLab. All these tools are necessary in order to develop code in Lagamine.
1 Setting up Git for Lagamine
1.1 Installing Git
![]()
- Windows:
Download and install Git for windows : https://gitforwindows.org/
For the setup, you will work with the Git Bash command line (can be accessed through the Start menu) - Linux:
sudo apt-get install git-core gitk
1.2 Connecting to GitLab
The GitLab server of the university can be accessed through the following link: https://gitlab.uliege.be/
1.2.1 Generating an SSH key pair
In order to work with GitLab, you will need to create a local copy of the Lagamine project on your computer. The first step to connect your computer to GitLab is to generate an SSH key pair allowing for secure connection between the GitLab server (online) and your computer (local). To generate the SSH key, simply follow the instructions from the GitLab documentation: https://docs.gitlab.com/ee/ssh/README.html (use an ED25519 SSH key)
1.2.2 Cloning the Lagamine repository
First of all, you should choose where you want to place your local Lagamine repository. To do this, you will use the “cd” command in Git Bash, followed by the address of the folder where you wish to put your Lagamine project. If your path contains spaces (for instance, a folder called My folder) put the folder name containing spaces in quotations (C:/”My folder”). In my case, I used the following command:
cd C:/Users/Hélène
Then you will clone the Lagamine repository from the server with the following command:
git clone git@gitlab.uliege.be:UEE/Lagamine.git
In this example, a Lagamine folder (repository) was created in C:/Users/Hélène. In this folder there is now a copy of the whole Lagamine project from GitLab:
- The Lagamine folder containing the sources (*.F files) of Lagamine
- The Prepro folder containing the sources of Prepro
- The Select folder containing the sources of Select
- A README.md file with the name of the project
1.3 Creating your branch to modify the code
First, you should create your branch on GitLab: https://gitlab.uliege.be/UEE/Lagamine
Click on the “+” sign next to « Lagamine » and select « New branch » (see figure 1).
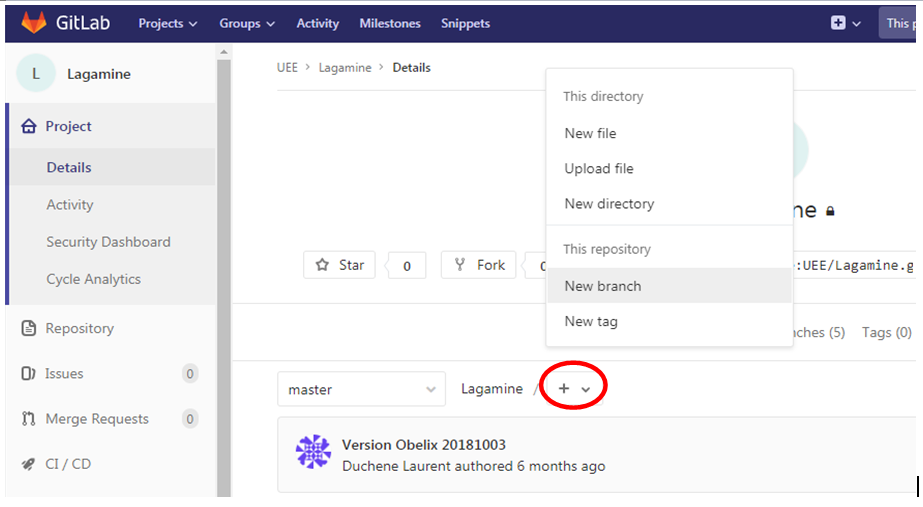 Fig. 1: Creating a new branch on GitLab
Name your branch (for simplicity, each branch should have the name of its developer); in the example, my branch is called « Helene ».
In order to work on your branch on your computer (locally), you must create a local version of your branch. To do so, go to the repository folder manually using the following command in Git Bash, e.g.:
cd C:/Users/Hélène/Lagamine
Then, enter the following command in the Git Bash (replace my_branch with the name of your branch):
git fetch
git branch --track my_branch origin/my_branch
2 Installing Visual Studio
2.1 Visual Studio
Download and install Visual Studio community. All you need to do is follow the instructions given here: https://docs.microsoft.com/en-us/visualstudio/install/install-visual-studio?view=vs-2019
During the setup, select the following workloads : « .NET Desktop development » & « Desktop development with C++ ».
You can add more workloads if you want, but these two are sufficient for developing in the Lagamine code.
2.2 Intel Fortran compiler
Intel offers a free Fortran compiler as part of its oneAPI Toolkits.
![]() OneAPI is not compatible with Windows 7. Your computer must run on Windows 8 or higher to install the OneAPI Toolkits.
OneAPI is not compatible with Windows 7. Your computer must run on Windows 8 or higher to install the OneAPI Toolkits. ![]()
You will need to download both the Intel® oneAPI Base Toolkit and the Intel® oneAPI HPC Toolkit.
Install the Base toolkit first. You can select the components you want to install, otherwise the standard installation is 11.1 GB.
The necessary components for coding in Fortran are:
- Intel® oneAPI DPC++/C++ Compiler
- Intel® oneAPI Threading Building Blocks
- Intel® Distribution for GDB*
- Intel® Integrated Performance Primitive
- Intel® oneAPI DPC++ Library
The size of the installation should be 4.1 GB.
On the next step of the installation, integrate the toolkit with Visual Studio.