Table of Contents
Installation guide
This page gives all the instructions for the installation of Visual Studio, Fortran compiler, and GitLab. All these tools are necessary in order to develop code in Lagamine.
1 Setting up Git for Lagamine
1.1 Installing Git
![]()
- Windows:
Download and install Git for windows : https://gitforwindows.org/
For the setup, you will work with the Git Bash command line (can be accessed through the Start menu) - Linux:
sudo apt-get install git-core gitk
1.2 Connecting to GitLab
The GitLab server of the university can be accessed through the following link: https://gitlab.uliege.be/
1.2.1 Generating an SSH key pair
In order to work with GitLab, you will need to create a local copy of the Lagamine project on your computer. The first step to connect your computer to GitLab is to generate an SSH key pair allowing for secure connection between the GitLab server (online) and your computer (local). To generate the SSH key, simply follow the instructions from the GitLab documentation: https://docs.gitlab.com/ee/user/ssh.html (use an ED25519 SSH key)
1.2.2 Cloning the Lagamine repository
First of all, you should choose where you want to place your local Lagamine repository. To do this, you will use the “cd” command in Git Bash, followed by the address of the folder where you wish to put your Lagamine project. If your path contains spaces (for instance, a folder called My folder) put the folder name containing spaces in quotations (C:/”My folder”). In my case, I used the following command:
cd C:/Users/Hélène
Then you will clone the Lagamine repository from the server with the following command:
git clone git@gitlab.uliege.be:UEE/Lagamine.git
In this example, a Lagamine folder (repository) was created in C:/Users/Hélène. In this folder there is now a copy of the whole Lagamine project from GitLab:
- The Lagamine folder containing the sources (*.F files) of Lagamine
- The Prepro folder containing the sources of Prepro
- The Select folder containing the sources of Select
- A README.md file with the name of the project
1.3 Creating your branch to modify the code
First, you should create your branch on GitLab: https://gitlab.uliege.be/UEE/Lagamine
Click on the “+” sign next to « Lagamine » and select « New branch » (see figure 1).
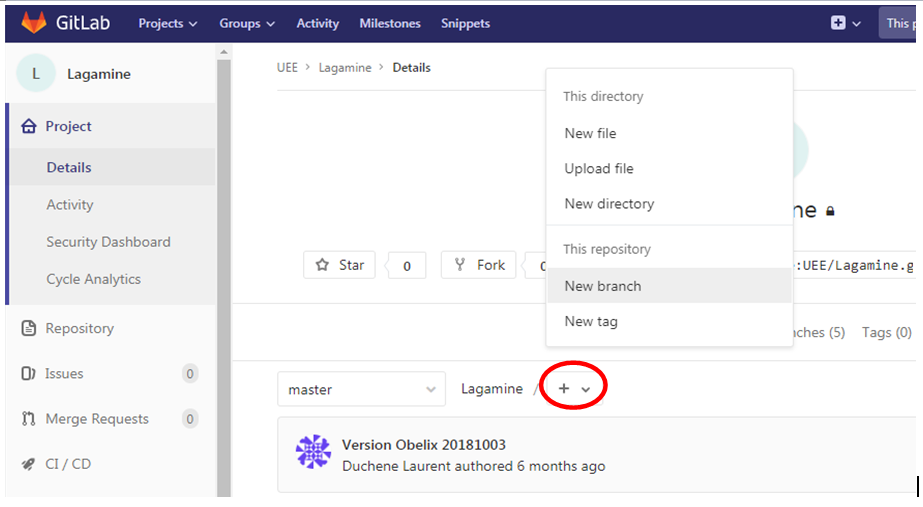 Fig. 1: Creating a new branch on GitLab
Name your branch (for simplicity, each branch should have the name of its developer); in the example, my branch is called « Helene ».
In order to work on your branch on your computer (locally), you must create a local version of your branch. To do so, go to the repository folder manually using the following command in Git Bash, e.g.:
cd C:/Users/Hélène/Lagamine
Then, enter the following command in the Git Bash (replace my_branch with the name of your branch):
git fetch
git branch --track my_branch origin/my_branch
2 Installing Visual Studio
2.1 Visual Studio
Download and install Visual Studio community. All you need to do is follow the instructions given here: https://docs.microsoft.com/en-us/visualstudio/install/install-visual-studio?view=vs-2019
During the setup, select the following workloads : « .NET Desktop development » & « Desktop development with C++ ».
You can add more workloads if you want, but these two are sufficient for developing in the Lagamine code.
2.2 Intel Fortran compiler
Intel offers a free Fortran compiler as part of its oneAPI Toolkits.
![]() OneAPI is not compatible with Windows 7. Your computer must run on Windows 8 or higher to install the OneAPI Toolkits.
OneAPI is not compatible with Windows 7. Your computer must run on Windows 8 or higher to install the OneAPI Toolkits. ![]()
You will need to download both the Intel® oneAPI Base Toolkit and the Intel® oneAPI HPC Toolkit.
Install the Base toolkit first. You can select the components you want to install (Custom installation), otherwise the standard installation is 11.1 GB.
The necessary components for coding in Fortran are:
- Intel® oneAPI Threading Building Blocks
- Intel® oneAPI DPC++/C++ Compiler
- Intel® oneAPI DPC++ Library
- Intel® oneAPI Math Kernel Library
- Intel® Distribution for GDB*
- Intel® Integrated Performance Primitive
On the next step of the installation, integrate the toolkit with Visual Studio.
For the HPC toolkit, use the recomended installation.
Once the installation is complete, you will need to add the folder containing libiomp5md.dll to the PATH of your computer.
- In Search, search for and then select: System (Control Panel)
- Click the “Advanced system settings” link
- Click on the “Environment Variables” box. In the section System Variables, you should have a variable called “IFORT_COMPILERXX” (XX is a number that depends on your version of OneAPI). This variable directs to a folder created during the OneAPI installation.
- Find the Path environment variable and select it. Click “Edit”.
- In the window that opened, click “New” and write:
| For WIndows 8-10 & older verisons of oneAPI (2021-2022) |
|---|
| %IFORT_COMPILERXX%redist\intel64_win\compiler. (N.B. replace XX with the number corresponding to the aforementioned variable) |
| For WIndows 11 & oneAPI 2024.0.1.– |
| The directory where the library is located (e.g.: “C:\Program Files (x86)\Intel\oneAPI\…” ) |
You may need to restart your computer for Visual Studio to recognize the Intel® Fortran compiler. An example of the environment variables edition process on windows 11 is given in figure 2

2.3 Create the Lagamine, Prepro, & Select projects
2.3.1 Lagamine
In the Git repository, create a « VS_Project » folder in which the visual studio projects will be created.
![]() You must create this folder in the Lagamine Git repository with the indicated name. This is important because the name “VS_Project” has been added in the .gitignore which allows to define files and folders that are particular to each user and therefore will not be synchronized in Git.
You must create this folder in the Lagamine Git repository with the indicated name. This is important because the name “VS_Project” has been added in the .gitignore which allows to define files and folders that are particular to each user and therefore will not be synchronized in Git. ![]()
In Visual Studio: File⟶New⟶Project
Select QuickWin Application, enter the name of the project (Lagamine) as well as the location where you wish to place your Lagamine project (the VS_Project folder you just created).
For now, you just created an empty project. To add the source files, right-click on the “Source files” folder in the Solution explorer, and select Add⟶Existing item (see figure 3). Select the source files (*.F) from the Lagamine folder created in your local Git repository (see 1.2.2). Visual Studio will automatically detect that these sources are linked to a Git repository.
 Fig. 3
If you want Visual Studio to generate the exe files with an icon, right-click on “Resource files” and select 'Lagamine.rc' from the source folder.
Fig. 3
If you want Visual Studio to generate the exe files with an icon, right-click on “Resource files” and select 'Lagamine.rc' from the source folder.
Note: with the resource file, you may need to install an additional VS component. Open the VS installer, click on “Modify”. Then on the right-hand panel, in the C++ category, select 'C++ MFC for latest v142 build tools (x86 & x64)' (name may vary depending on your version of VS).
2.3.2 Prepro and Select
Repeat the instructions of 2.3.1 using respectively the sources of Prepro and Select to generate each project.
2.3.3 Alldebug
To access all 3 projects (Lagamine, Prepro, Select) at the same time in Visual Studio, it is possible to create a common solution for the 3.
To do so, create a new QuickWin project (File⟶New⟶Project) called AllDebug (you can choose a different name if you want). Once this project is created, right-click on “Solution ‘AllDebug’” in the solution explorer and select Add⟶Existing project. Select the Lagamine.vfproj project that you created previously and repeat those steps for Prepro and Select. You can then delete the “AllDebug” project that was automatically generated by Visual Studio (right-click on “AllDebug” - carefull, not “Solution ‘AllDebug’” – and click ‘delete’).
2.4 Compiler options
2.4.1 General configuration
These properties must be selected for each project (Lagamine, Prepro, Select) separately.
In Visual Studio go to Project⟶Properties
- Click on Configuration manager, then under “Active solution platform” select “x64”. If “x64” is not already available, select <New> and type in x64.
N.B. It is very important that you make sure to select x64 and not x86 (Default - 32-bit) as the libraries that Lagamine depends on are 64-bit libraries. x86 is used for 32-bit code and is not compatible with the mkl librairies. - Then add the following data in Linker:
- General : Additional Library Directories : C:\Program Files (x86)\Intel\oneAPI\mkl\2021.2.0\lib\intel64 (see figure 2)
 The path can be different depending on what you chose during the installation of Intel® OneAPI.
 - Input : Additional dependencies : mkl_intel_ilp64.lib mkl_intel_thread.lib mkl_core.lib libiomp5md.lib
- System :
- Stack reserve size : 25000000
- Stack commit size : 25000000

2.4.2 Fortran
You need to put the following information in the “Fortran” section of the project properties:
- Optimization :
- Optimization : Disable (/Od) (in the Debug configuration)
- Optimization : Maximize Speed (in the Release configuration)
- Preprocessor :
- Preprocess Source File : Yes (/fpp)
- Preprocessor Definitions : MSDOS_ ; FEM2_
- Diagnostics :
- Check routine Interfaces : No
- Data :
- Initialize variable to zero : Yes (/Qinit:zero)
- Initialize arrays as well as scalars : Yes (/Qinit:arrays)
- Run-Time :
- Generate traceback information : No
- Check array and string bounds : No
- Check Stack Frame : No
2.4.3 Solve_DSS.F
The SOLVE_DSS (in the Lagamine project) subroutine is used for the parallelized version of Lagamine. In this subroutine, the integers should be interpreted in 64 bits (they are not by default). To change this, right-click on the Solve_Dss subroutine in the Solution explorer, then Properties⟶Data⟶Default Integer KIND : 8 (/integer_size :64)
3 Useful links
- General information on Git (in french) : https://openclassrooms.com/fr/courses/1233741-gerez-vos-codes-source-avec-git
- GitLab documentation: https://docs.gitlab.com/ee/README.html
- Documentation on how to use Git in Visual Studio : https://docs.microsoft.com/fr-fr/azure/devops/repos/git/gitquickstart?view=azure-devops&tabs=visual-studio