User Tools
Sidebar
Table of Contents
Test battery - Old method
The test battery consists in a large number of simple simulations that should be run everytime changes are made to the Lagamine code to ensure these changes do not alter previous developments.
The goal of the test battery is to improve the robustness of the code and avoid mistakes.
Implemented by: Ehssen Betaieb, 2021
How does it work ?
Flowchart
The organisation chart of the procedure is presented in figure 1.
- The principal Python code, “Test_battery_launcher.py”, is used to run the test battery.
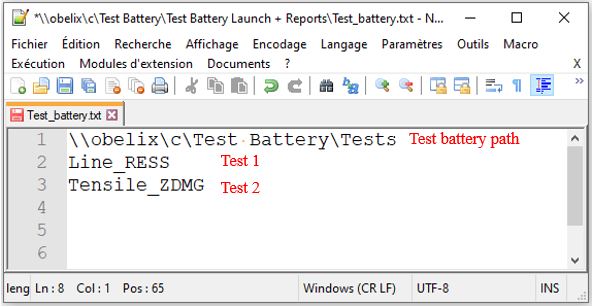
- The code reads the names of the tests to be run in the general file “Test_battery.txt”.
- For each test listed in “Test_battery.txt”, the code then runs Prepro and Lagamine.
- Afterwards, the code runs a python routine specific to each test to compare that the values obtained are the same as the reference values (values that were obtained using a previous stable version of Lagamine).
- The results of the comparison of each test are written in a report file.
 Fig. 1: Test battery flowchart
For the moment, the battery of tests is installed in “\\obelix\c\Test Battery”.
Main code
- The principal python script to run the test battery: Test_battery_launcher.py
- The file defining the test battery path and the names of the tests in the same folder as the principal python script: Test_battery.txt. The structure of this file is shown in figure 3.
Tests
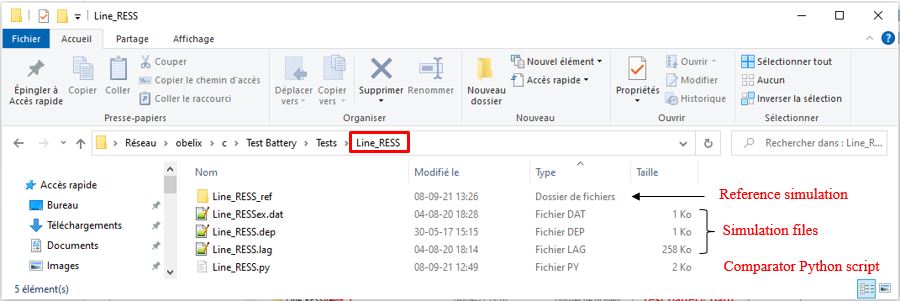
The folder 'Tests' (see figure 4) contains all the tests.
Each test is in a separate folder named with the same name as the test defined in “Test_battery.txt”. This folder contains:
- The simulation files (*.lag, *ex.dat, etc.)
- The reference simulation in a folder with the same name as the test +“_ref”
N.B. this folder can contain only the result files (*.ipe, *.ipn, *.rea, …) and not the totality of the simulation files, as they are the same as the test files. - A comparator python script attached to each test. This script must have the same name as its corresponding test. In the script, the user defines the numerical results to compare and the cost function.
Output files
Local report
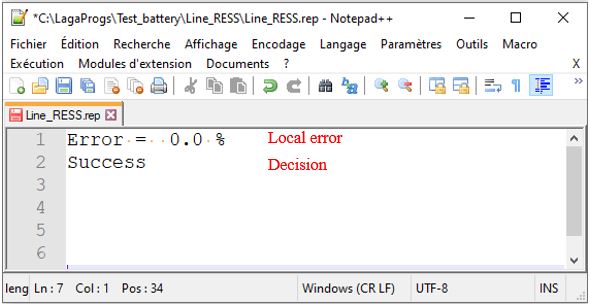
The local report is attached to the test folder and has the same name as the test (name_test.rep). This local report contains the details of the error(s) obtained when comparing the new test results to the reference.
It is structured as follows:
- Local error
- Decision (Success/ Failure): depending on the value of the error, the test is considered as passed or failed. The recommanded acceptance value for the error is 0.1% for a Mini test and 1% for a Big test.
 Fig. 5: Local report
Global report
The global report is attached to the principal python script folder (Report_date.rep).
It contains the following information:
- Number of tests
- Global error
- List of tests
- Decision (Success/ Failure): once one test is failed, the whole test battery is failed
- List of failed tests (if the test battery is failed)
How to add your own test to the battery
Creating your test
In order to ensure that your developments in the Lagamine code will keep functioning properly, it is highly recommanded that you add one or several tests specific to the law(s) or element(s) you use and develop.
To test a material law or an element, you should design a simple test, using only 1 element when possible. Preferably, your test should not take more than a few seconds to run. If you need to test something more complex, you can also create a “Big” test. However, the total number of Big tests should be limited to avoid excessive computational times for the whole test battery.
For instance, to test the visco-plastic 'CHAB' law, I created a test using a single element submitted to 2 cycles of alternated tension and compression (see CHAB_SC_TMF).
Once you have designed your test and created the necessary simulation files, you must identify the important variables that indicate whether your law/element is behaving as it should.
For the 'CHAB' law, I will check the values of the stress tensor, the thermal strain, the plastic strain along the loading direction, and the damage variables. These values can be obtained via the *.ipe result file.
Be sure to print out the values you want to check at the time step(s) you see fit.
To define the time steps at which you want a printing, you can use ILSAV = 1 or 2 in the ex.dat file.
Check Appendix 1: Printing options and Appendix 9: Printing files for more info about printing files.
Comparator code
After you have created your test and identified the variables that need to be checked, you need to write the comparator code.
This code should be written in a Python script. If Python is not already installed on your computer, you can download it from the official Python website: https://www.python.org/downloads/
Several editors exist to facilitate coding and debugging with Python. You can use Spyder or Visual Studio Code for instance.
For the comparator code, it is recommanded to use one of the existing comparators as an example. You can search in the Dokuwiki tests that use the same type of result files as you to find a code similar to what you should write.
Adding your test to the battery
To add a new test to the battery, you should:
- Add the new test to “http://www.lagamine.uliege.be/dokuwiki/doku.php/battery/listtests”
- Modify the file Test_battery.txt on Obelix: add the name of the new test
- Add the folder containing your test to the test battery directory. This folder should contain:
- The files of simulation (with the same name as the test)
- The reference simulation folder (with the same name as the test + “_ref”)
- The comparator python script (with the same name as the test)


